
A Practical Guide to Person Segmentation and Background Replacement in SwiftUI
Step-by-Step: Using GeneratePersonSegmentationRequest to Add Simple Portrait Cutouts to Your iOS App

Want to use AI to alter a photo’s background?
It’s probably easier than you think.
But when you first start working with Vision’s latest APIs you’re going to run into some classic roadblocks.
What do you do with GeneratePersonSegmentationRequest?
What’s that “mask” you get back?
How do you even get the mask to match up with the image?
Let’s figure it out step by step, with code, pitfalls, and the reasoning behind the steps.
What’s included in this article?
The basic flow for GeneratePersonSegmentationRequest
An entire SwiftUI code example, including a detailed explanation
Important input/output types, and a peek behind the API
What I learned and debugging notes from actual usage
If you want to ignore the usual trial-and-error, and just get “AI cutout” working in your own app, then keep on reading.
What is GeneratePersonSegmentationRequest?
Simply put: It finds people in a photo and generates a black and white mask, white for the person, black for the background.
It’s built into Apple’s Vision framework, runs locally (no cloud or setup), and you don’t need any background in ML theory to use it. The API is simple:
Provide it with a photo (CIImage, CGImage and CVPixelBuffer all work)
Initialize the request
Set quality if desired
Run it and get the mask
Vision returns a grayscale image, keeping the same aspect ratio as its source. White pixels = person. Black pixels = background. This mask can be used to drive separation, color changes, blurring, or any compositing operation you desire.
Real-World Code: SwiftUI Integration
Here's a complete working SwiftUI example.
import SwiftUI
import Vision
import CoreImage.CIFilterBuiltins
struct Segmentation: View {
@State var image: CGImage?
var body: some View {
VStack {
if let image = image {
Image(uiImage: UIImage(cgImage: image))
.resizable()
.scaledToFit()
} else {
// Placeholder image of your choice
Image("man")
.resizable()
.scaledToFit()
}
Button(action: {
self.getSegmentation()
}, label: {
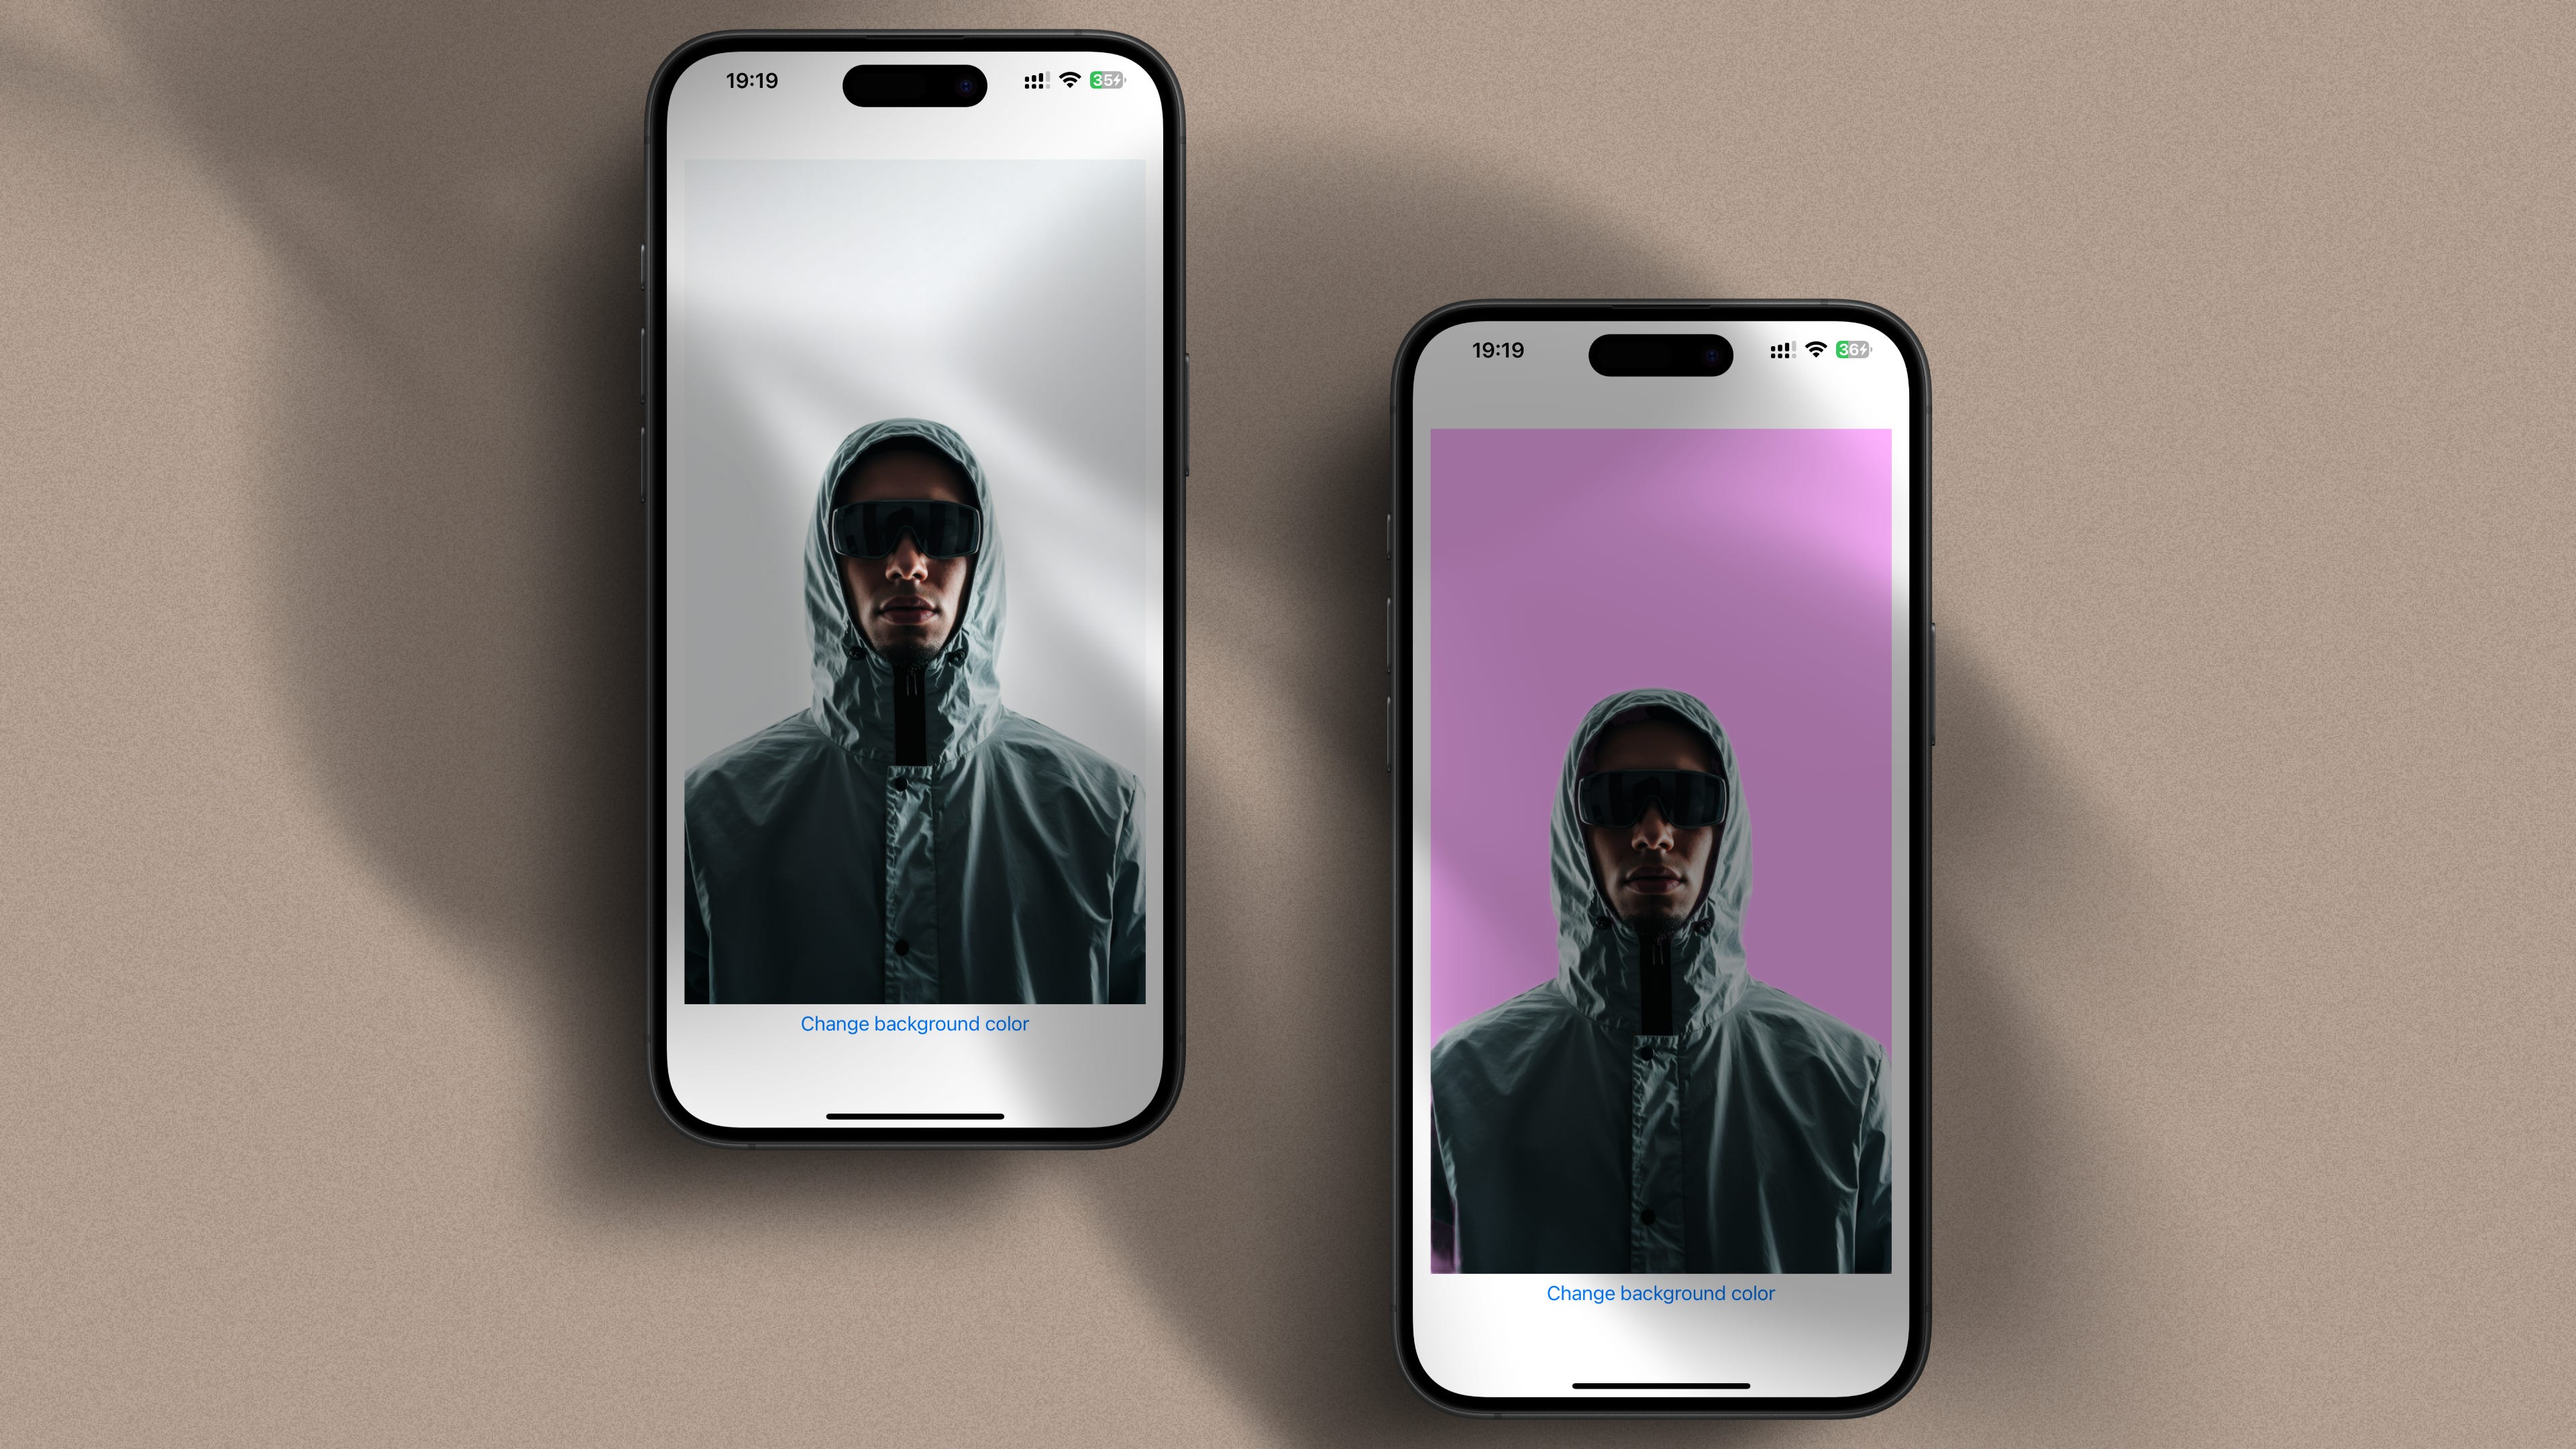
Text("Change background color")
})
}
.padding()
}
private func getSegmentation(){
Task {
do {
guard let uiImage = UIImage(named: "man"),
let observation = try await generatePersonSegmentation(image: uiImage) else { return }
self.image = applyMauveBackground(
originalImage: uiImage,
observation: observation
)
} catch {
print("Error generating persons: \(error)")
}
}
}
private func applyMauveBackground(originalImage: UIImage, observation: PixelBufferObservation) -> CGImage? {
guard let maskCGImage = try? observation.cgImage,
let ciOriginalImage = CIImage(image: originalImage) else { return nil }
var ciMaskImage = CIImage(cgImage: maskCGImage)
let originalExtent = ciOriginalImage.extent
ciMaskImage = CIImage(cgImage: maskCGImage).transformed(by: CGAffineTransform(scaleX: originalExtent.width / CGFloat(maskCGImage.width), y: originalExtent.height / CGFloat(maskCGImage.height)))
let mauveBackground = CIImage(color: CIColor(red: 1.0, green: 0.7, blue: 1.0))
.cropped(to: ciOriginalImage.extent)
let blendFilter = CIFilter.blendWithMask()
blendFilter.inputImage = ciOriginalImage
blendFilter.backgroundImage = mauveBackground
blendFilter.maskImage = ciMaskImage
let context = CIContext()
guard let outputImage = blendFilter.outputImage,
let cgImage = context.createCGImage(outputImage, from: outputImage.extent) else { return nil }
return cgImage
}
private func generatePersonSegmentation(image: UIImage) async throws -> PixelBufferObservation? {
guard let image = CIImage(image: image) else { return nil }
do{
let request = GeneratePersonSegmentationRequest()
request.qualityLevel = .balanced
let result = try await request.perform(on: image)
return result
} catch {
print("Encountered an error when performing the request: \(error.localizedDescription)")
}
return nil
}
}We'll go through each step after.
Step 1: Run the person segmentation request
The main API is GeneratePersonSegmentationRequest().
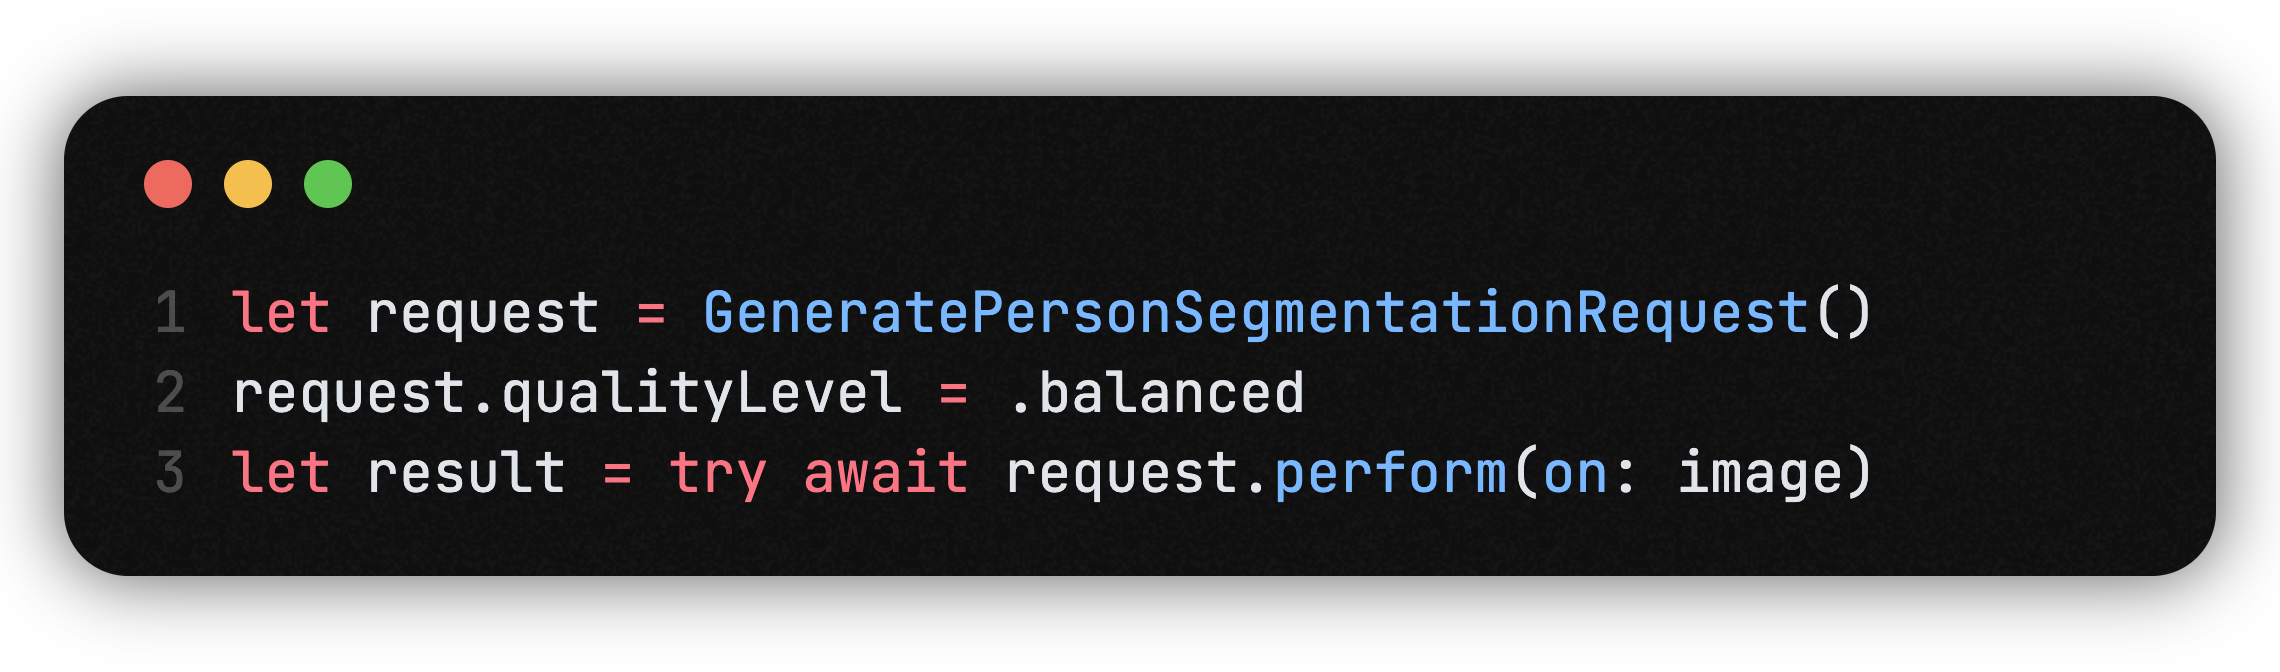
There are three quality levels: .fast, .balanced, .accurate. Higher quality takes more time.
perform(on: image) takes CIImage, but also accepts CGImage or CVPixelBuffer.
The result is a PixelBufferObservation, which contains the mask data.
Step 2: Align and composite with the mask
Inside applyMauveBackground, there are three jobs:
Extract the mask as CGImage
let maskCGImage = try? observation.cgImage
Scale the mask to match your imageMasks and photos rarely have the same pixel dimensions, and if you skip this you will get weird misalignments.
Composite using CoreImage's blendWithMask
inputImage: your original photo
backgroundImage: any replacement (in this case solid mauve)
maskImage: your computed mask
Export the finished image
context.createCGImage(outputImage, from: outputImage.extent)
Practical Notes and Gotchas
The mask size is rarely the same as your image—always scale it, or your result will look wrong.
The API is tuned for people only. Don't expect miracles with cats, statues, or random objects.
Sometimes, complex backgrounds may produce fuzzy edges on mask edges. If need be, add a slight Gaussian blur to the mask (not shown, but makes it very easy).
On an iPhone 12 or newer, .balanced is enough for real-time use.
For live video, get around rendering limits by dropping your resolution, or frame rate, until it flows.
Why Vision Person Segmentation is Worth Your Time
It's not magic, but it is robust, fast, and dead simple. There's no training, no cloud, just results that you can build into a real app. The real strength of it is how easily you can wire it into any SwiftUI flow—great for developers who want to ship, not just play with code.
Have questions, or want to see what else you can do with masks. What are masks? Just leave a comment. There's still so much more to explore with AI and SwiftUI, and you are ahead of the game just trying.
Let me know if you would like this customized in other ways (shorter, more technical, even more in-depth).